Despite my new year resolution of limiting the amount projects to take on, I still find myself multitasking various personal projects. Outside of my full time job, I have to manage my free time accordingly to make sure they get done. At the moment I’m editing a film I shot back in 2002 whilst planning a partnership in creating animations. I also dip into Andy Parker’s film making exploits and still very much have ambitions for making my next Paper Cut film. All of these things are either pre and post production and it’s easy to slip into the disillusion that nothing’s getting done and the only time it seems like something is getting anywhere is if I’m shooting or completing something. This isn’t the case at all however, as those are a small portion of what goes into making a film. The key to getting through production on your own is planning and organisation and it always pays to dedicate plenty of time to it.
Looking retrospectively at the Wenlock gIiding films I made last year, I think of how much can realistically get done during a busy working period in my day job. The Wenlock Olympian Games was an event, so it couldn’t be scripted or storyboarded in a conventional sense like you would filming a drama, but I was given a brief and an expected itinerary for the event which I would be required to document. With these in mind I was quickly able to create an expected structure, whilst considering opportunities to make other films that would make the final DVD worth the target audiences money.
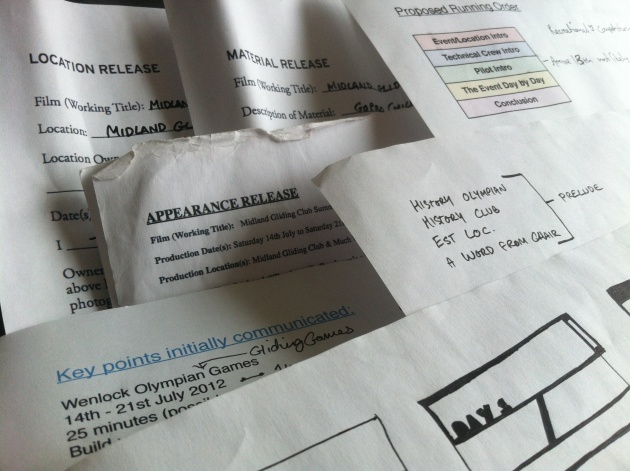
Release forms, a list of ideas, a proposed running order with client meeting notes and visual sketches were prepared for the shoot.
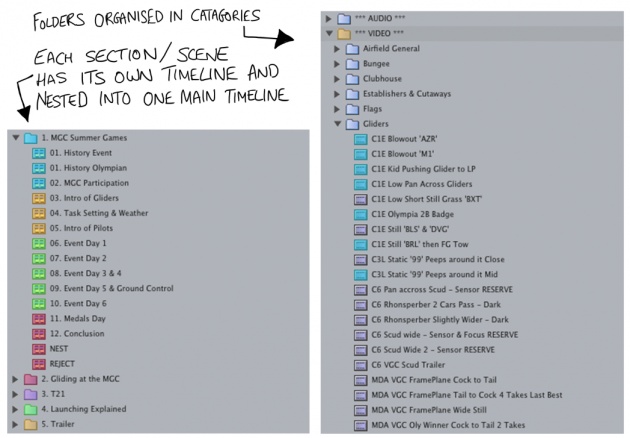
There were eight full days of shooting which accumulated a lot of footage, so it was important I uploaded the footage at various points of each day to a laptop and put the clips into folders called ‘Event Day 1 - Early’ for example. This meant that when I took the huge amount of footage into post production, it wasn’t one giant unrecognisable list, the folders communicated to me. The next phase was to name all the clips and delete any completely unusable shots. The names indicated the day it was shot, numerically when it was shot, what the shot is and on long takes; when the best bit of the clip is, for example: ‘ED1E 01 - Mid glider being towed - 5.10 Landing in BG’. Once I had done this, I trimmed all the clips to get rid of useless bits where I’m perhaps waiting for something to happen, so I leave the camera rolling until it happens. Now all the clips have the day it was shot in the title, I moved the shots into categoric folders (Gliders, Clubhouse, Establishing Shots, etc.). All the while, I was colour coding the shots; a colour depending on which film I want to use the shot for and eventually to tell me if I’ve already used the shot somewhere in a film. Here's a general breakdown:
1. When you upload your footage, put them in folders named after the shoot day it was shot on.
2. Watch all the clips and name your shots after:
A. The shoot day
B. When it was shot (For example: First shot of the day = 01)
C. Short description of the shot (Perhaps use text speak or things like 'CU' for 'close up' to keep it short)
D. If on a long take, put how many minutes/seconds into the shot until something useful happens.
3. Edit off all the useless bits and export all the clips into a trimmed folder. Not all clips will need this. If not, put them in the trimmed folder anyway, they're already trimmed.
4. If it helps you, put all the clips into folders relevant to categories you associate them with.
Doing all that can be fairly boring and seems like it’s time consuming, but it really does save time and bother when you get to the creative part of the edit. From there, I constructed the edit into different sections (shown in the left screen grab on the image above) and told the story the best I could entirely from interviews. What wasn’t covered, I noted down what might eventually need to be explained with on screen text. At this point, any intimidation of the target length of the film and the gargantuan quantity of video clips was irrelevant, the film was already too long and the interviews needed to be trimmed right down. Once trimmed, it was time to get creative with the footage, now neatly catagorised and in date and time order. Finding one or two shots out of over four hundred really isn’t a problem with this routine. If you’re filming something that requires a large quantity of footage, give this a go. It will save a huge amount trouble.
Also, and this is a big one for any production; remember to back your footage up on another hard drive when you upload. Invest in a new external hard drive if you need to, it's that important. Losing footage is crushing.
Always duplicate your eggs, don't keep them in one basket.


