Video Credits: Jason Whaling via YouTube
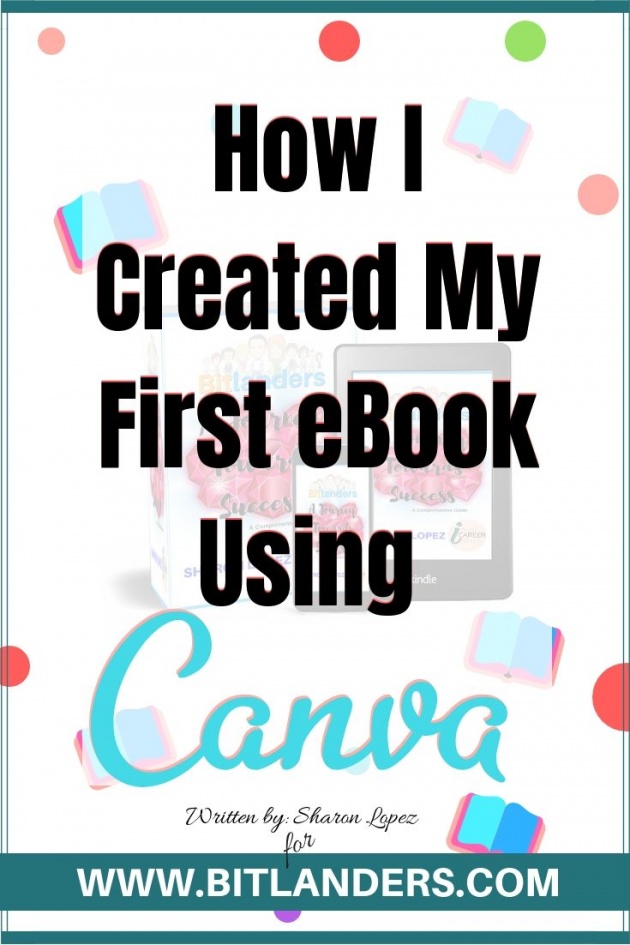
Image Credits: Sharon Lopez via Bitlanders
EBook has been one of the most popular ways of sharing knowledge, ideas, and stories, we can do in current time. I could frequently come across blog posts sharing the benefits of publishing an eBook and among those is the possibility of having a passive income if done properly. These positive experiences being shared by successful bloggers is what prompted me to learn to create an eBook.
It has been a while since I started writing my first eBook but due to time constraint, it took me some time to have it done. Additionally, as I have to acquire relevant skill and competency to do the job, I have to set it aside for some time pending the acquisition of knowledge that I need to accomplish the task.
I started reading several articles, tried to sign up to some online courses and watch YouTube Videos in order to increase my understanding of the subject. Admittedly, this activity had most of the time being dropped at the bottom of my schedules because I need to prioritize the activities which could bring in immediate income.
Though it took me longer than usual, I finally found a good time to finish the eBook. Thanks to the long Christmas vacation. Sharing below are the steps I went through before I finally launched my first eBook.
1. FINDING A TOPIC

Image Credits: Tero Vesalainen via Pixabay
It’s the initial step which I had to spend time with. Though I already had in mind what topic I would like to write. I was thinking of something for the first eBook I want to create. It should be something very special to me.
So for my very first eBook, I am dedicating it to my most favorite site, Bitlanders. I am aware that I might have a limited audience on this topic but I want to do this to give honor to a site special to me.
Three Things that Prompted me to Choose this Specific topic:
✻This topic will be helpful to other members of Bitlanders especially those who are just starting with the site and for those who have been here for a while but are finding the process a bit complicated.
✻It can encourage more individuals to join Bitlanders which will benefit me and the site as well.
✻I want to share the blessings I received from joining the site and through writing good things about it, I may be able to spread the good news as well as a guide other individuals that they may earn as well.
2. BREAKING DOWN TOPICS INTO SUBTOPICS
The familiarity with the subject makes it easier for me to pursue the project. Plus those messages I frequently receive from fellow members and from my other social friends helped me in coming up ideas I needed to complete the eBook.
One of the challenges I encountered during the crafting of the eBook is that of the part where I need to break down the main topic into sub-topics. Organizing our thoughts into one whole idea and presenting these ideas in a manner that would be easier for the reader to absorb requires a considerable amount of time.
I decided to create a topic outline to make it easier for me to supply the necessary information. I also make a lot of revisions before I continue with the formatting to include images on the content.
3. FINDING RELEVANT IMAGES

Image Credits: The Digital Artist via Pixabay
Readers may find written contents quite boring without the necessary images. A relevant image can help in presenting the idea in a more understandable manner. It can also help in retaining the reader's attention.
I have placed images to where it is necessary especially on those parts where I discussed some steps which I believed to be important to readers.
The images I used are mostly actual activities within the platform. I believe that the most appropriate images are the actual photos of the different activities.
3. STARTING WITH CANVA
In case you haven’t known yet, Canva is not only a site to create blog graphics but for other projects as well. Among which is creating an eBook. You probably know that I am creating most of my blog graphics on Canva but this is the first time I will be using it to create an eBook. I hope this won’t be the last as I have already a long list of topics to write about.
I already prepared my topic in a Word document. Though you may use Google Docs as well. You may also encode the document directly to Canva.
✎Choosing the Size and Template
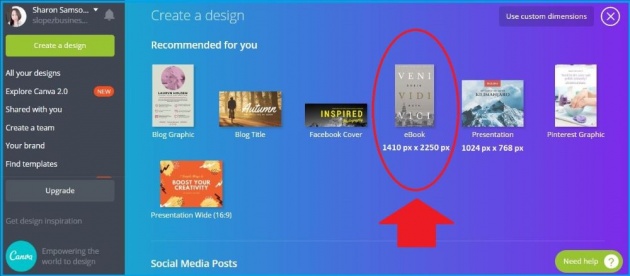
Image Credits: Sharon Lopez via Bitlanders
There are two templates available which we can choose from, the vertical template for eBook with a size of 1410 x 2250 pixels and the presentation template with a size of 1024 x 768 pixels. I chose the vertical template because it is more compatible with mobile viewing.
You can choose from the different available templates or you can choose to start with a blank canvass. I choose the latter so that I may be able to implement my own style.
✎Creating the Cover
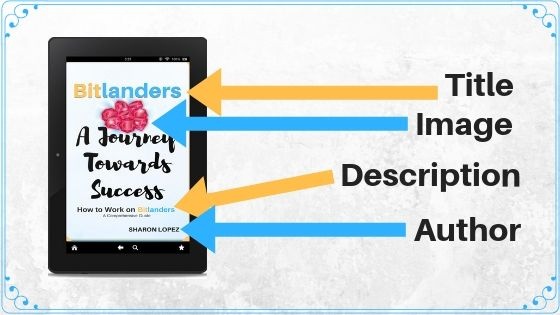
Image Credits: Sharon Lopez via Bitlanders
(Image created via Canva)
The cover is the first thing that a reader will see when opening the document. It should be designed in a manner that the readers will be encouraged to continue reading. I got some inspirations from 99 Designs in the creation of the cover.
Still, with Canva, I used the first page for the eBook cover. I included a small image, the title, and my name as the author. I also included a description below the title.
✎Table of Contents
The table of contents is the breakdown of all the parts and subtopics of the content. For this project, I did not include page numbers.
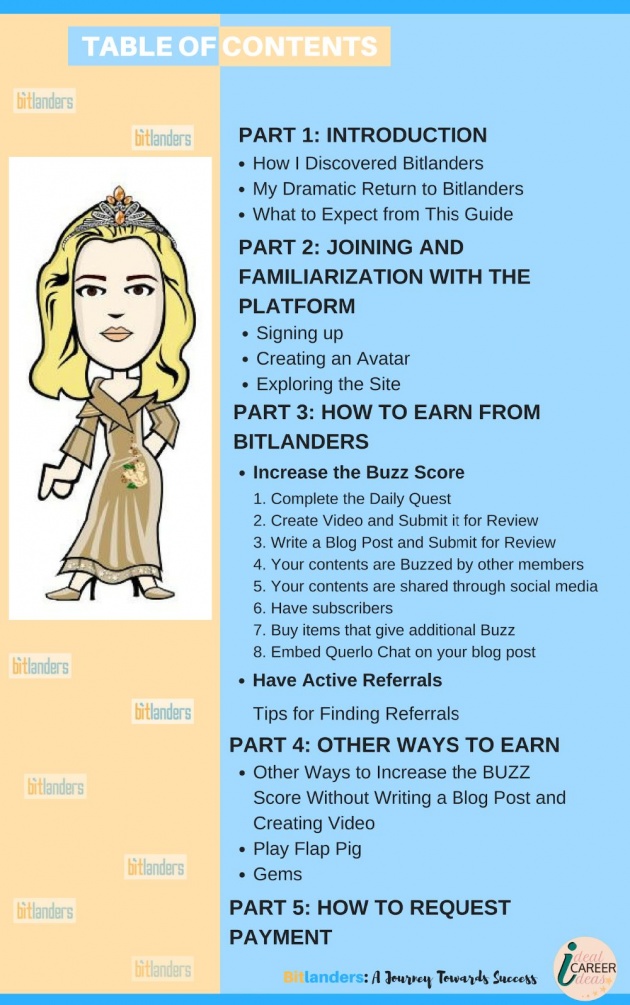
Image Credits: Sharon Lopez via Bitlanders
✎The Content
I added text boxes in the editor where I pasted the content I previously prepared. I also added relevant images as needed. I make sure that every page has been prepared and completed before jumping onto the next page. I need to treat each page separately.
Though Canva allows 30 pages per eBook, I noticed the frequent stalling as I added more pages to my content. I decided to create documents with 15 pages at the minimum.

Image Credits: Canva Support Page
4. MERGING CONTENTS
Because I have 3 separate documents, I need to use a third-party to merge the documents into one PDF file. For this project, I used SmallPDF to merge my documents into one PDF file. The process is easy and fast. You don't even need to create an account in order to use the platform.
5. SELLING THE EBOOK
Here comes the most complicated part, selling the eBook. Since I am just starting in this kind of activity, I decided to sell it on my own blog. Though for my succeeding projects, I would like to try uploading my future projects to other sites.
Here's how I did it:
✎Uploading the eBook to My Blog
I uploaded the eBook to my WordPress blog by adding a New Media File. the file automatically saved and I can attach it to my contents within the site. I wrote a blog post which serves as an introductory article.
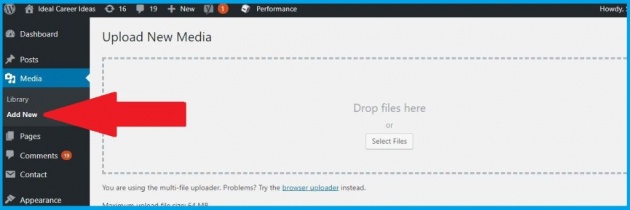
Image Credits: Sharon Lopez via Bitlanders
✎Creating Cover for Promotional Activities
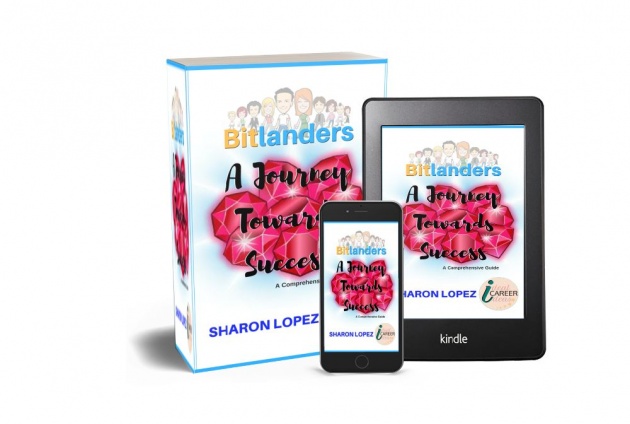
Image Credits: Sharon Lopez via Bitlanders
(eBook Mock Cover created via DIY Book Design)
I created a 3D Mock Cover for my eBook with the help of another 3rd party, DIY Book Design. It's an amazing site where we can choose from the different awesome eBook Cover design templates available.
✎Setting Up the Payment System
I added a PayPal Button on my blog with the use of PayPal Buy Now Button Plugin. This plugin is easy to install. Other bloggers are using WooCommerce plugin but I prefer this one.
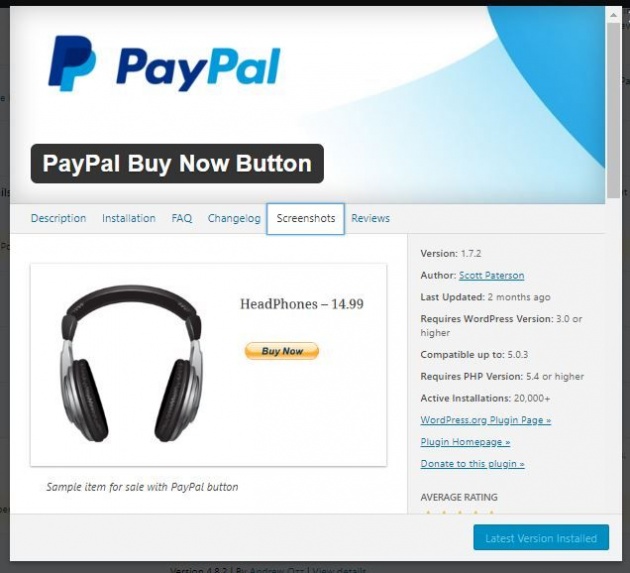
Image Credits: Sharon Lopez via Bitlanders
✎Sharing the product
I am sharing the product with my Facebook Page, Twitter, and Pinterest. I am still monitoring the progress and working for its improvement. I am planning to create videos and post it on YouTube to reach more audience and potential buyers.
Here is another video tutorial on how to create an eBook using Canva. Enjoy watching!
Video Credits: Michelle MacConnell via YouTube
On the final thought...
One of the happiest moment in our career is being able to achieve what we really aspired for. I know that am far from that point, not even halfway. But having to accomplish small achievement is something we should celebrate.
Canva is only one of the platforms that we could use in order to create our own eBook. Watch out for more articles about eBooks, blogging, and ways to be financially independent.
Thank you for visiting and reading my post.
More from this author:
- Canva vs Crello: Battle of Designs
- Introduction to Google Docs
- 3 Major Mistakes to Avoid to Achieve More Success in 2019
Before you leave this page, please take time to answer the Querlo Survey below:
DISCLAIMER: The views and opinions expressed in this blog post are that of the author and does not in any way represent the agency or department she currently belongs.
ADDITIONAL NOTE: The sites mentioned in this post are for information purposes only and links are provided for easy access. The author does not receive any remuneration from the said companies or sites.
♥-♥-♥-♥-♥-♥-♥-♥-♥-♥-♥-♥-♥-♥-♥-♥-♥-♥-♥-♥-♥-♥-♥-♥-♥-♥-♥-♥-♥-♥-♥-♥-♥-♥-♥-♥-♥
Written for Bitlanders
by ♥SHARON LOPEZ
Date: January 12, 2019
Visit my blog profile for more ♥BLOG POSTS
Sharon Lopez is the Author/Owner of IDEAL CAREER IDEAS
Want to earn from sharing your opinions through blogging? Join us in Bitlanders and claim your 1 DOLLAR REWARD upon signing up. CLICK HERE TO JOIN