How I created a random looking, 14-piece group for my daughter’s new living room.
Our youngest daughter (DD2) bought a house over a year ago. Built in the mid-90’s, it hasn’t been updated. Needless to say, there has been a lot to do to bring it up-to-date while filling the wants and needs of a young adult. Entering the house, the foyer opens into the dining room (to the right) and living room (straight ahead). A wall of large windows allows a view of the backyard from this entire area. Luckily, our three children inherited my decorating gene. DD2 knows what she wants but relies on Mom to help her carry it out. Mistakes can be costly at any age. Over the next few months, I look forward to sharing several decorating projects I’ll be doing with her.

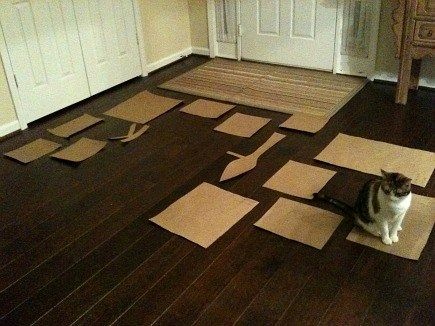
After cutting out each frame pattern and outlining other items we had purchased to mix in, Layla helped move them around the floor until I was happy with the grouping. DD2 wanted them randomly spaced and mixed with a few found objects. She thought that would have a younger feel than symmetrical rows – I have to agree. Notice the large empty space near the center – I had already started the next step when I realized I needed to find my iPhone and take a photo. (Oops!)
Once I began placing the patterns on the wall, I decided they needed to hang the opposite from the way I had placed them on the floor. I emailed the photo to myself and flipped it on my laptop. I then used the laptop photo as a guide while putting them up on the wall with blue painter’s tape. Even though this was temporary, I made sure to check everything with a small level to get them straight for fear of making the grouping lopsided.
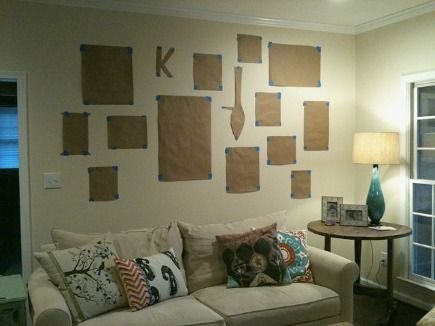
This took longer than planned, but was well worth “seeing” before putting nails in the semi-freshly painted walls. Also, I wanted DD2’s approval and didn’t want to hang them by myself. Warning: painter’s tape does not stick for more than a day or two, depending on the weather. She called the next afternoon to say some patterns were starting to come off the wall.
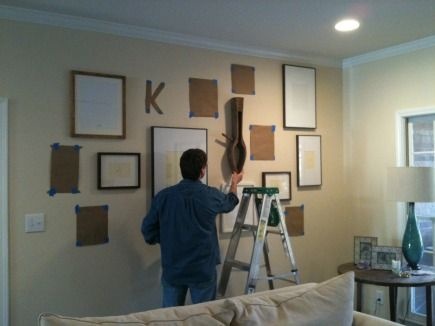
Once she gave her approval, we started with the larger frames. Mr. Shops measured the frames for hook placements, transferred those measurements to each brown-paper pattern, then hammered in the picture hangers before taking down the paper. That’s a super easy way to get everything exactly where it should be — or so I thought. Only after uploading the photos did I notice the far right/upper frame was hanging vertically. Not knowing a few of the patterns had fallen off completely, I didn’t double-check their exact placement before we began. (Oops #2!) I had wondered why it was so close to the trim but never considered that DD2 had replaced one incorrectly. It was an easy fix, so no biggie.
Photograph selections were actually not finalized until after the frames were up. Having already ordered the metal letter “K” it was temporarily installed, but has since been replaced with a blue letter “A.” DD2 emailed me her favorite picture choices and I narrowed them down, making sure the subject matter, as well as the red and color vs sepia were scattered somewhat evenly.
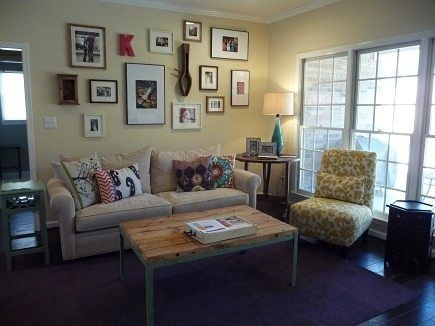
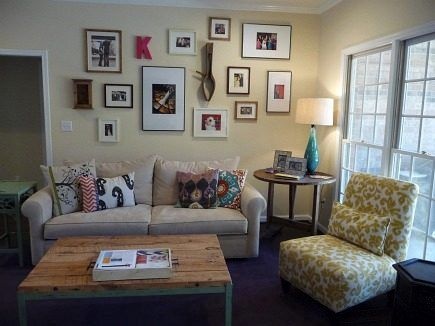
Almost everything was purchased locally. All of the frames are from Pottery Barn. The chair, throw pillows, coffee table and round table are from AtHome Furnishings. The painted end table was found at my favorite local antique store along with the vintage saddle stretcher, wooden box (both hanging on the wall) and vintage hand-blown glass lamp. DD2 still needs to decide what to put in the wooden box. Purplemodular carpet tiles are from FLOR, which was recently featured on Atticmag. Curtain panels are next on her list and will almost complete the space. The chair is one of a pair and will be moved to the master bedroom sitting area when a replacement is found. She loves the picture wall and the way the room is taking shape. I like that it can be changed as her life changes.
Credit : atticmag.com