Raspberry Pi Basic Guide
1. Raspberry Pi Basic Hardware Setup
1.1. Extra Hardware You Will Need
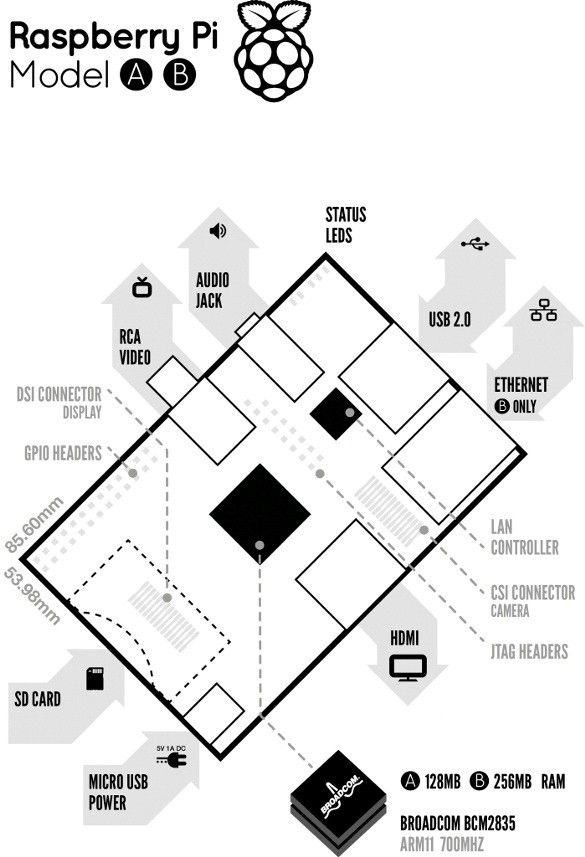
The Raspberry Pi board has following features/devices:
• a processor and graphics chip,
• program memory (RAM),
• various interfaces and
• connectors for external devices
Some external devices are necessary, others are optional. Raspberry Pi functions in the same way as a standard PC, it needs a keyboard for command entry, a display unit (a monitor or LCD) and a power supply of atleast 750mA and 5V rating.
It also needs ‘mass-storage’, but a hard disk-drive of the type found in a typical PC is not really in keeping with the tiny size of Raspberry Pi. Instead we will use an SD Flash memory card normally used in other digital devices like digital cameras etc., configured in such a way to ‘look like’ a hard drive to Raspberry Pi’s processor. Raspberry Pi will ‘boot’ from this card in the same way as a PC ‘boots up’ into Windows from its hard disk. Boot is nothing but to load the Operating System into RAM.
The following are needed to get started with Raspberry Pi:
• SD card with pre loaded Linux OS
o Usually Raspbian Wheezy is preferred
• USB keyboard and Mouse
• TV or monitor (with HDMI, DVI / Composite/ SCART input)
• Power supply (1A, 5V DC)
• Video cable to match the TV or monitor used
Optional devices include:
• Internet connection, Model A or B: USB Wi-Fi adaptor
• Internet connection, Model B only: LAN (Ethernet) cable
• Powered USB hub
• Case
1.2. Connecting Everything Together
1. Plug in the preloaded SD Card (this is in bootable mode) into the Raspberry Pi board.
2. Plug in the USB keyboard and mouse into the Raspberry Pi board, perhaps via a USB hub. Use the powered usb hub if necessary.
3. Plug in a video cable into the screen (TV or monitor) and into the Raspberry Pi.
4. Plug in your extras into the Raspberry Pi (USB Wi-Fi, Ethernet cable, external hard drive etc.). This is where you may really need a powered USB hub.
5. Ensure that your USB hub (if any) and screen are working.
6. Plug in the power supply into the mains socket.
7. With your screen on, plug the power supply into the Raspberry Pi microUSB socket.
8. The Raspberry Pi should boot up now and display messages on the screen.
It is always suggested to connect the MicroUSB power to the unit last While most connections can be made during powered on, it is best practice to connect items such as displays with the powered off.
The Raspberry Pi may take a long time to boot when powered-on for the first time, so be patient and have cup of coffee!
1.3. Operating System SD Card
As the Raspberry Pi board has no internal mass-storage or built-in operating system it needs an SD card preloaded with a version of the Linux OS.
• You can create your own pre loaded card using any suitable SD card (8 GB or above). Pre loaded SD cards are also available from the Raspberry Pi Shop.
1.4. Keyboard & Mouse
Most standard USB keyboards and mice will function with the Raspberry Pi board. Wireless keyboard/mice should also work, and only need a single USB port for an RF-dongle. If you use a Bluetooth keyboard or mouse you are required a Bluetooth USB-dongle, which also uses a single port.
Remember that the Model A has only one USB port and the Model B has two (typically a keyboard and mouse will consume a USB-port each).
1.5. Display
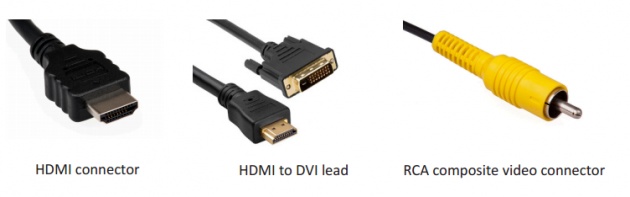
There are two main connection options for the Raspberry Pi display, HDMI (High Definition) and Composite (Standard Definition).
• HD TVs and many LCD monitors can be connected using a full-size 'male' HDMI cable, and with an inexpensive adapter if DVI is to be used. HDMI 1.3 and HDMI 1.4 are supported and a version 1.4 cable is suggested. The Raspberry Pi outputs audio and video via HMDI and it does not support HDMI input, so be careful.
• Older TVs can easily be connected using Composite video (a yellow-to-yellow RCA cable) or via SCART (using a Composite video to SCART adaptor). Both PAL and NTSC format TVs are supported with Raspberry Pi.
When using a composite video connection, audio is available through the 3.5 mm audio jack socket, and can be sent to your TV, headphones or an amplifier etc. whatever you use. To send audio to your TV etc., you will need a cable which adapts from 3.5 mm to double RCA connectors((red and white) ).
Note: No analogue VGA output is available on Raspberry Pi board.
1.6. Power Supply
The unit is powered via the microUSB(uUSB) connector (only the power pins are connected, so it cannot transfer data over this connection). A standard modern phone charger with a uUSB connector will do, providing it can supply at least 700 mA at +5Vdc. Ensure your power supply's ratings carefully. Appropriate mains adaptors are available from the Raspberry Pi Shop and are suggested if you are not sure what to use.
1.7. Cables
You will need some cables to connect up your Raspberry Pi system.
• Video cables:
o HDMI-A cable o HDMI-A cable + DVI adapter o Composite video cable
o Composite video cable + SCART adaptor
• Audio cable (not required if you use the HDMI video connection to a TV)
• Ethernet/LAN cable (Model B only)
1.8. Additional Peripherals
You may decide you want to use many other devices with your Raspberry Pi, such as Flash Drives or Portable Hard Drives, Speakers etc.
1.8.1. Internet Connectivity
This may be via an Ethernet/LAN cable (standard RJ45 connector) or a USB Wi-Fi adaptor. The Raspberry Pi Model B Ethernet port is auto-sensing which means that it may be connected to a router or directly to another computer (without the want for a crossover cable).
1.8.2. USB hub
In order to connect additional devices to the Raspberry Pi, you may want to acquire a USB hub, which will allow numerous devices to be used. It is suggested that a powered hub is used - this will provide any additional power to the devices without disturbing the Raspberry Pi itself. A USB 2.0 model is suggested. The USB 1.1 is fine for both keyboards and mice, but may not be fast ample for other accessories.
1.8.3. Case
Since the Raspberry Pi is supplied without a case, it is important to make sure that you do not use it in dwellings where it will come into interaction with conductive metal or liquids, unless appropriately protected.
1.8.4. Expansion & Low-Level Peripherals
If you want to use the low-level interfaces accessible on the Raspberry Pi, then ensure you have an appropriate plug for the GPIO header pins. Also if you have a specific low-level project in mind, then ensure you design-in appropriate shield circuits to keep your Raspberry Pi safe.
For further info and sources : Raspberry Pi foundation