For today's blog I want to take a simple look at the stages of production and give a brief introduction to some of the steps I take when planning and executing a short film. I will be covering the three stages including pre production, production and postproduction. So lets begin.
Pre Production ‘work done on a product, especially a film or broadcast programme, before full-scale production begins’
Idea – The first thing you need is an idea. It’s good practice to get in to the habit of recording an idea when you have it. You could have an ideas book where you write things down. Maybe you draw sketches or stick things in for inspiration? I personally record my voice on to my phone talking about an idea, or sometimes I will write things down if I have a pen handy. Whatever your methods make sure you’re keeping a record of your ideas. You may not intend to do an idea straight away but once its down you can always come back to them in the future.
Treatment – A treatment is your short down on paper. It should sell your film to the person reading it and give the basic concept and possibly an introduction to characters and locations. If you check out some of my past blog posts I have covered writing a treatment and given an example from one of my shorts ‘Ready or Not’
Mood board – A mood board could be a collection of images together to give the viewer the feel of your film. This could be photos you have taken or even just stills from other films, but basically anything that you think communicates the visual look and feel for your short.
Script – Now you have an idea its time to translate this in to a script. Scripts have a specific format that you follow when writing one. You can get programs that will be a huge help for this. Final Draft is the industry standard one, however it is not cheap and so is not for someone on a budget. Adobe Story is one that comes free if you subscribe to the cloud. I think there may be a free version with limited functionality? Celtex is a good option and is free to download and I believe comes with other film making tools.
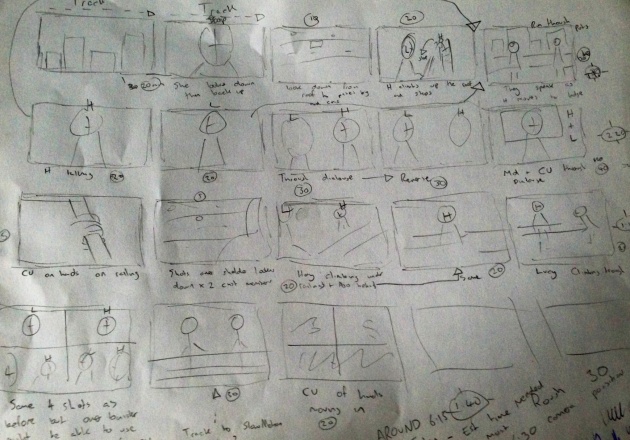
Storyboards – A storyboard is the film in stills showing the shots, framing and angle you will be shooting. I am not the best person at drawing storyboards so one method I tend to use is doing a first draft storyboard. I sketch down the shots very quickly using version of stick men. This helps me to logistically think about how I am going to shoot a scene. I will then photograph the scene with a stand in and use the stills for the final storyboard.
Shot list – A shot list translates across from your storyboard however the details are written down in a list. You may have a list with columns such as shot number, details, location, props, actors and any more information you feel necessary. Seeing your shot list in this format should help you to see the most practical method of shooting you film. It helps to also have a shot list in the order you plan to shoot.
Floor plans – Floor plans will let the camera team know the locations of the shots. It should also show lighting setups that you will be doing and possible character movements. I do this by having an A4 basic plan of the location. Then on top I have see through overlays with actor movements, camera and lighting setups.
Crew – Selecting the right amount of crew for your short is crucial. As a director it is important that your attention is not stretched to thin. You are there to concentrate on getting the best performance out of your actors. In between takes you should be working with the cast not worrying about if people know what they are doing. This is the job of the AD team, if you have a good 1st AD then they will take care of sorting the crew and getting everything in order on the shoot day. A good camera team will shorten times between camera changes and so on. Having enough crew to make your shoot run smooth is vital.
Casting – This can be difficult when you don’t have a big budget. I have been lucky on some occasions working with great actors who really want the film to be a great success. I have also worked with people who feel like because it’s only paid expenses then gracing you with their presents on the shoot day is enough. I will do a casting session where I will meet the person and go through parts of the script and then I will do a recall to check I am making the best decision. As for the logistics of casting you can find some great people on star now and casting call, both are free to use.
Call sheet – Call sheets are something I have changed over time to better suit my shoots. I started with lots and lots of information and over time narrowed it down to what’s necessary. it should fit one piece of paper, doing some A5 prints are good idea because they are small and handy to carry. The information I put on is a basic schedule, location, contact details, weather, emergency service number and location that’s pretty much it. You can put more info on if you wish but it’s really about what you feel is relevant.
Production ‘The process of shooting your short film’

Shooting a Sequence – When it comes to shooting your short make sure you plan to shoot the easiest possible way. Don’t shoot in order to your storyboard instead shoot according to the smallest number of locations and lighting setups. This will cut the amount of times you are visiting a location and also the amount of lighting changes you need to do. Remember it takes less time to move the actors than to move the camera. On my short falling the actress had to leave early so we did all her shots first and then used a stand in for when the actor was delivering his lines. Shoot practical.
Shoot for the Edit – This is something I personally do. I make sure when I am filming I go through the scene from each camera setup. Even though according to the storyboard I may not need the whole scene from that location it can and will save you in the edit. A conversation between two people may not cut together exactly how you storyboarded it because you may have a great reaction shot you want to use instead of showing the dialogue. Shoot the whole scene from each camera set up, It wont add on to much time to the shoot but it will save you a huge amount of time in the edit.
Sound & Shot Logging – Doing this on the shoot day will save you time in the edit. Logging your sound and shots will aid you in syncing later and will allow you to know which takes are the best. Taking the information in the edit will aid you in making your EDL.
Post Production ‘work done on a film or recording after filming or recording has taken place’
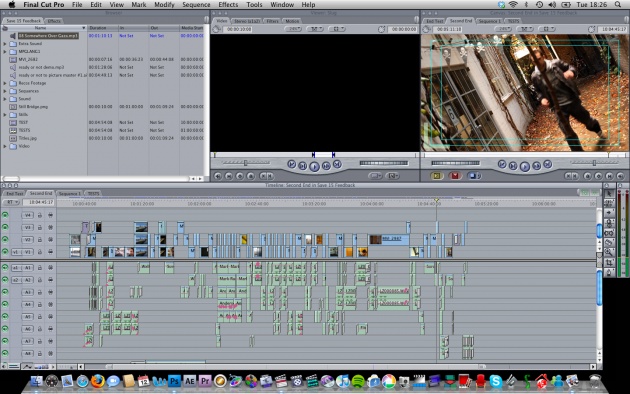
Ingesting the Footage – Depending on the camera you shot on and the system you are using to edit it is important that you transfer the footage correctly. I shoot on a Red and edit in Adobe so I can literally just drag the footage across in to the edit with no conversion. If I were editing in FCP I would need to transcode all the footage to a format that the program could read. This would be a lower quality than I had shot and so I would need to do an offline edit (working with a lower quality footage to get the visuals locked). Then I would export and EDL or XML and do an online edit in a program that could handle the full quality footage. It seems more and more programs are able to handle native footage these days and would recommend the adobe suit for anyone who is looking for a program to edit.
EDL & Sample Edit – An EDL is basically watching your clips through and selecting the takes that you think are the best. This is where the paperwork from the shoot can help speed up the process. Something I like to do is create a timeline in the edit and put takes next to each other, this helps me make my decision by watching the takes one after the other. Once the clips are selected you should compile them to make a basic sample edit. It is important that through the process you get feedback from other people to let you know what works and what you could change to make the edit better and flow smoother. Some thing to keep in mind is cut on movement as this feels natural and will disguise the edit to the audience.
Lock the Visuals & Sound Sync – Once you are happy with the visual edit you should lock it down and begin to work on the sound edit. Remember to lay an atoms track down so that it bridges the gaps in the audio. Dissolve the end of audio files so they drift out slowly rather than just cutting off. Nothing puts me off a film more that badly done audio.
Foley – Foley is adding in sound for things happening in the shot that you may not have recorded the sound for on the shoot day. Maybe it’s the sound of someone chewing some food, if you couldn’t get the boom in close enough in the shot to pick up the sound then you can do this after in a studio or even a car (works pretty well at blocking out sound). After that it’s just a case of syncing up the sound with the shot. Foley sound can really bring a film to life. One of my favourite directors George Romero said he used to watch his films through without the visuals and if the sound got boring he new he would need to do something.
Special Effects & Grade – Once you have finished the sound edit you can begin on any special effects and grading. You can use a multitude of programs to aid in you such as after effects, speed grade, davinci resolve and many more. For grading you could look at magic bullet that comes with many pre-sets for a verity of different looks and is compatible with most editing software.
Outputting the Final Master – Once you have completed your film it is important that you export for the best quality version of your film. You may finish to disc or an Internet site, for these you would do a lower file size with a smaller bit rate. Make sure you always keep the highest quality master of your film for screenings and such.
Sell the Film - Lastly sell your film. After all the effort you have gone to make it you want people to see it. The past few films I have made have previewed on film annex and I can say the views I get here outnumber any other site by a substantial amount. Send your film out over social networks any way possible because you never know who is going to watch it.
I hope you enjoyed my latest blog and be sure to check out my shorts and my WebTV
http://www.filmannex.com/webtv/markkuczewski