Image courtesy of rackcdn.com
Do you find it hard to add tags to your blog? Have you tried a few tactics before, but nothing seems to work out? Don’t worry about it because you are not alone in your dilemma. I have this problem too, at least in the past. Being an explorer, I always try to find ways to make usual things much easier. Lately, I found a way to make it easy to input tags to our blogs.
The solution to this problem is a simple tool or software. I have been using this for sometime, and it never failed me even once. I started using it when I was still active at Bubblews.com. The software application I’m talking about is M8 Free Clipboard, or in short FreeClip, by M8 Software.

Image courtesy of softwarelicense.arizona.edu
What Is FreeClip?
FreeClip is a clipboard capturing software designed for Windows operating systems. It is a freeware, or free software, available for distribution to a wide audience. The program is lightweight, and the installer takes up a small space of 6.89 MB. Download it for free here.
The basic version is available for free. Although the features are limited, it already contains almost everything you need for practical purposes. If you want more sophisticated features, feel free to upgrade to the full version.

Image courtesy of colormeup.de
Basically, FreeClip is just like Windows built-in clipboard, but it takes the matter to a whole new level. While Windows clipboard allows users to capture one item at a time, FreeClip gives you the capacity to capture multiple items one after another for later use.
All you need to do is copy or cut items in other programs and they will be saved in FreeClip in an organized manner. When you are ready to use those stored items in other programs, just click the items in FreeClip one by one. Plus, FreeClip captures texts, photos and videos copied to the clipboard for use at a later time.

Image courtesy of www.demondemon.com
How to Use FreeClip to Add Tags?
Adding tags to your blog involves two steps. If you write your blog in a word processor like Microsoft Word, make sure the tags are written and organized at the end of your blog. If you are ready to input the tags to your blog, just copy each tag one by one using CTRL+C. Each copied item is recorded in FreeClip in the order that each is copied, as you can see below.
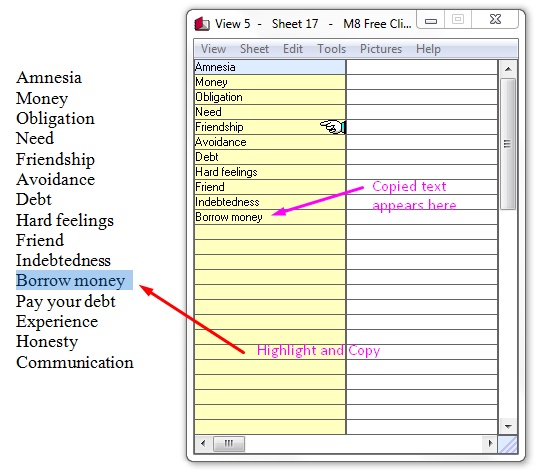 Image courtesy: Mine
Now go to your blog and paste each tag there one by one. This phase involves two steps one after another. Make sure you put your cursor on the tags section. The first part is you click on an item in FreeClip and it will appear in the tags field. The second part is you press Space or Enter on your keyboard to add the tag to your blog. Repeat these steps for the remaining tags and you are done. Simple, isn’t it? See the photo below.
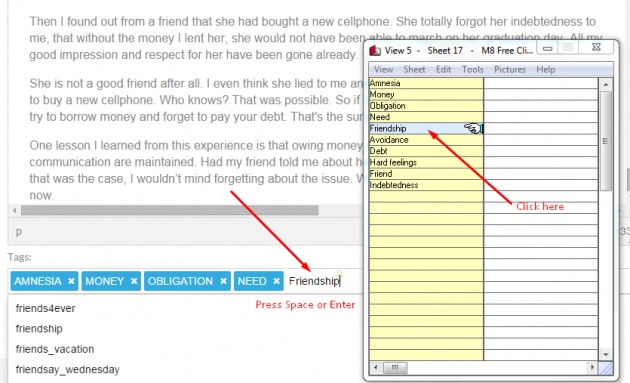
Image courtesy: Mine
Learning the Ropes
It requires a little getting used to in order to get the job done right and easy. Don’t forget to format your tags correctly by connecting tags containing more than one word with hyphens. Do this preparation before you start storing tags in FreeClip.
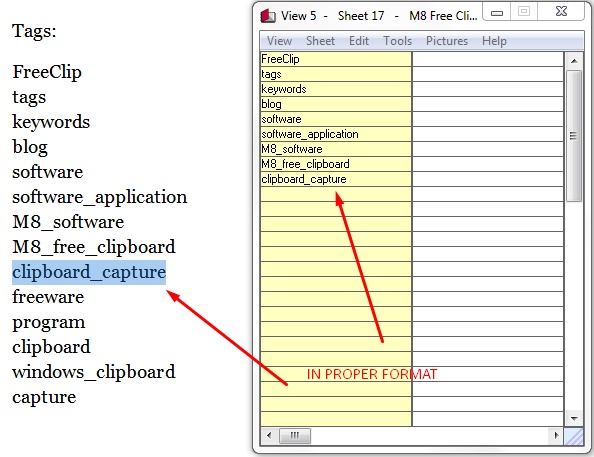
Image courtesy: Mine
There is more to FreeClip than the features outlined above. You can even use it to store your favorite URLs and go to them directly in one click. Just spend some time familiarizing this simple but cool software, and it will serve your needs now and in the future. Good luck.
![]()
* Warning: This blog is my original work. Please don’t plagiarize.