In this post, I'll detail how I went about creating Uyir's house! This will be the house where Uyir has spent nearly his entire life living in and a house that you will see quite often in the final film!
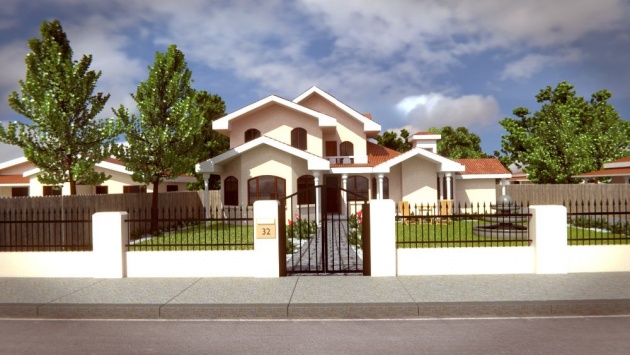
Creating a house is one of the most interesting and enjoyable aspects aspects of 3D modelling for me. There are many different styles of houses you can create. There are rich houses, poor houses, cartoony houses, scary houses, and so on. I started out by doing some basic research using Google Images. Since Uyir is a wealthy and peaceful old man, I wanted to create a house that reflected that. This is the house that caught my interest and I went with this:
Using the reference as a guide, I started to model out the basic shapes. Since this wasn't a front on image, I had to sort of take an educated guess at the proportions. In the image above, the house can be modelled with a couple of cubes. I added a loop cut in the middle of some of the cubes and move the top vertices up to look like the house shape. The main idea was to block out the main shapes for now. Also, I added in loop cuts to shape out the windows and delete the faces where the windows can be placed.
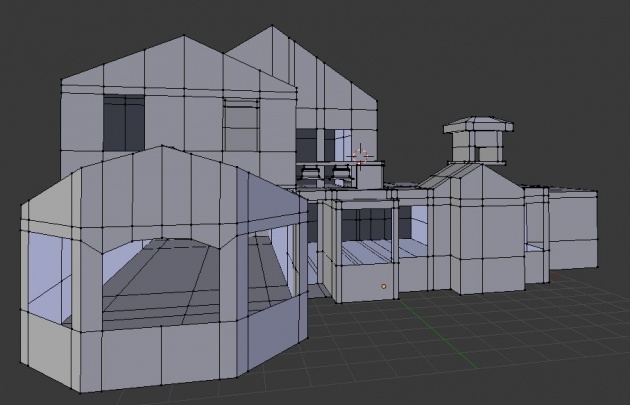
I modelled the roof by starting with a new cube. It will be better to separate the roof mesh from the house mesh as it would be easier to texture later on. The roof can be created with a few extrusions and following along the lines of the house mesh. I also created other connecting items to the house (in this case, those columns/supporting poles which were created using just a cylinder).
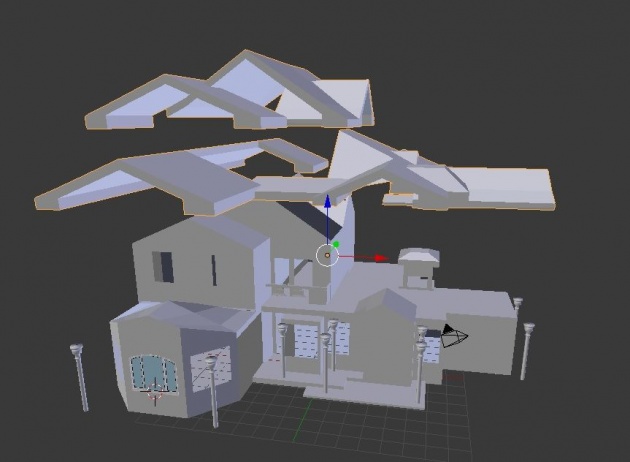
Finally, I added windows to the window holes. I used the 'Window Generator 2' addon available in the latest Blender builds. Within a few minutes of tweaking the settings, you can get some cool-looking windows. Here is the result of all the parts of the model so far:
I then applied textures and shaders to Uyir's house. I avoided UV-unwrapping and used procedural textures to the house. To get the stucco effect for the walls, I used the shader setup explained here. The windows had a normal glass shader and the poles had a slightly glossy shader.
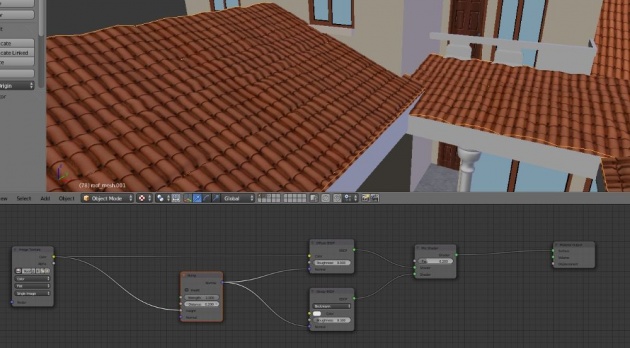
The roof however, is the one that requires some time. It's best to UV-unwrap the roof. Then download a seamless roof texture that appeals to you and apply to the roof. Here is the shader setup for the roof:
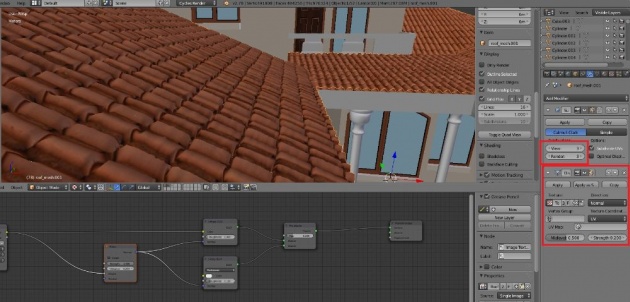
Finally, I added bumping to the roof itself. To do this, I added a subsurf modifier with a high level. Then I added a Displace modifier with the roof UV texture. This gives your roof a 3D look and thus saves you a LOT of time compared to having to individually place those tiles, which not only would be tedious and boring, but can also eat up memory unnecessarily.
I then modelled a fence, threw in some fresh cut grass and pebbles to represent the lawn, some trees and also some filler items. Putting them together and adding some polishing touches gives me the final render!

Subscribe to follow updates on this project, and if you're not registered on BitLanders, register here!
Website: uyirthefilm.weebly.com
BA blog: blenderartists.org/forum/showthread.php?343742-Uyir-Short-Film-WIP