In the last post, I detailed how I went about the concept art as well as the story. In this post, I'll detail the storyboarding and animatic stage.
Even though I'm developing a short film on my own, it's really important to have a storyboard as well as an animatic to follow up with. This helps tremendously and makes your short film progress a lot smoother. Without a storyboard and animatic, there's generally a higher chance that your short film will fail to see the light of day! This is especially the case for animated short films.
A storyboard is simply a sequence of images. Each image can represent of a shot in your film. Having a storyboard gives you the freedom to experiment with different types of shots and different types of angles. You can also ask others for feedback and get opinions on which types of shots work and which doesn't. Getting feedback is also valuable since the shot you think worked in your head might not resonate well with the audience and having feedback early on, can save costs later on.
For my storyboards, I used the free painting software MyPaint. MyPaint gives you an infinite canvas containing storyboard-styled boxes. I used this to draw all the main shots of the film. I would draw one storyboard image for each camera change. This would serve my purpose well for the animatic stage. Again, I used the Wacom Bamboo Pen and Tablet to draw all the images. Additionally, I could have colored it to get an idea of the color scheme but I'm not really all that advanced (I'm also slightly lazy)..
Here is a portion of my storyboard:
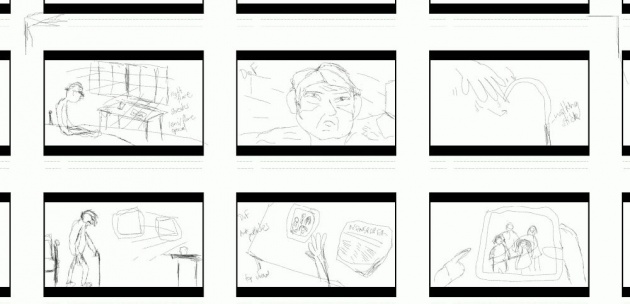
It's clear that I'm pretty bad at drawing but at this stage, I don't really care and I'm really looking to see if the shots will resonate well with the audience. From the above scene, an old man is sitting by his bed and stares out the window while sunlight streaks shine through. He picks up his walking stick, walks (rather slowly and laboured) to his study table. He picks up an old photo of him and his daughter and wipes clean the dust. Since I'm really a one-man team, I can follow what's happening in the storyboards. However, if you're working within a team, it might benefit knowing how to draw (at least a little bit!).
After the storyboards are done, I then move onto creating an animatic. An animatic is pretty much the final version of your short film. Only with really bad visuals and poor sound. The idea is that you get a feel for what the final film is like and whether you think the film will be worth slaving hours upon hours over the next few months (or even years)! Top Hollywood companies do this too. The filmmaker usually pitches their story idea with a producer using animatics and producers decide whether they think this film will be a blockbuster, and if so, helps produce the film. The storyboard helps you mix and match ideas for your shots and scenes, while an animatic helps with timing your shots and scenes and getting a sense of the overall mood of the film.
After creating my storyboard, I would put each storyboard image in a video editor and combine it with audio. I would go to royalty-free music websites and download the previews and sync it with the storyboards. I don't purchase any of the music until I'm really happy with it. I would extend or cut the length of each image to see if it 'flows' well. At times, I find that I need more images to help convey the emotion better and that's ok, because I'll go back and draw some more images. After that, I would add sound effects, and background sounds (for example, the sound of people in a busy street). At this stage, I render out pretty much the full film, but without the awesome graphics and surround sound. This rendered very quickly and I had an idea what the film will be like.
After some modifications here and there, I was extremely happy with the story and this gave me confidence as well as motivation to carry out the film. Already, I feel it will be much better than my previous short film "Vetri", and that type of confidence can help in the overall success of the project (although I shouldn't get too ahead of myself!)
Here is a portion of the animatic based on the above storyboards:
I couldn't add the music as I have yet to purchase the royalty-free music. Here, I get an idea of the timing of my shots. However, it still is a bit vague. I'm still not entirely sure if this is working and it would be better to see some camera movement as well. For this, I will be creating a "running-time animatic" later on. This was suggested by user sundialsvc4 from the BlenderArtists forums. The idea is that, once I create all my characters and sets, I then create another animatic containing my characters (in their environments) doing VERY basic animation. I don't have to create any walk cycles or anything, just move them from point A to B and see if it looks good. This allows me again to be very flexible with deciding which types of shots work and I can discard the animation later on. I'll detail this progress later on when I get there.
Now that I've completed the storyboard and animatic and pretty much happy with it, I'm pretty much done with the pre-production phase. I'll now be detailing each step of the production phase.
Here is a rough breakdown for the film project:
Production
- Create characters (old man and daughter) - 1 month
- Create sets and environments - 1 month
- Running-time animatic - 1 week
- Animation - 3 months
- Rendering - On-going
Post-production
- Find music (done)
- Combine rendered images with animatic
- Add sound effects
- Polish
- RELEASE!
I'll be detailing the character development stage in the next post! Subscribe for more updates!
Website: http://thilakanathanstudios.weebly.com
BA: http://blenderartists.org/forum/showthread.php?343742-Uyir-Short-Film-WIP