1. Pick a domain name.
Already have a domain registered? Jump to #2
The domain name for this blog is theblogstarter.com. If you type that domain name into an internet browser anywhere in the world you will be sent to this site.
You want to pick a name that is unique and descriptive, so your audience will immediately know what your blog is about.
Another option is to simply use your own name. For example, I have registered scottchow.com. You can also add your middle name or middle initial if you find your name is already taken.
Many of the top bloggers use their own name as their domain name. This has the added benefit of preventing someone else from registering your name, allowing you to secure your “virtual real estate”.
Once you have some candidates for domain names, you will need to choose a domain extension.
.com is the gold standard, but .net and .org work just as well. I would suggest staying away from other extensions like .us or .biz, as they are not as familiar to most people.
You may find that the domain name you want is already taken. This happens to all of us. In fact, it happened to me with this site. Blogstarter.com was already taken, so instead, I chose theblogstarter.com. If you find that your desired name is already taken you can try adding simple words like “the”, “a”, or “my” to the beginning of the name, or you can try adding dashes between words such as the-blog-starter.com.
2. Select your plan. The starter plan is the one I recommend for new bloggers. Click “Select” to choose your plan. 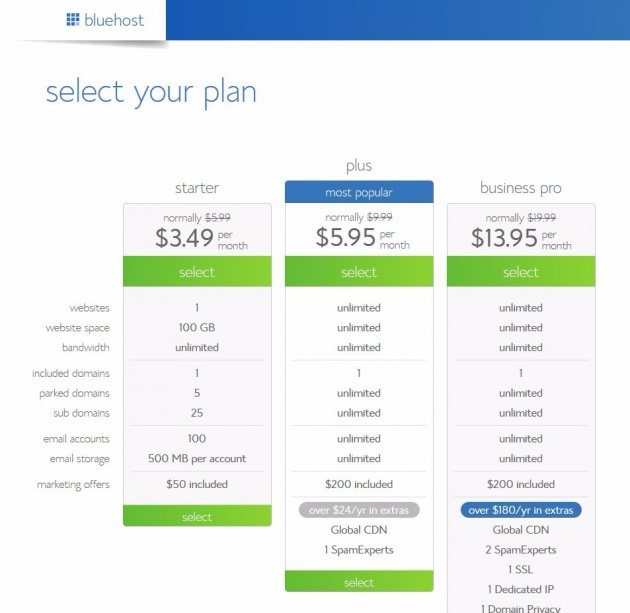
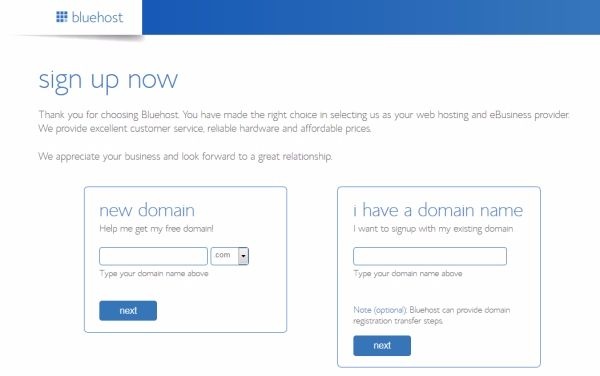
3. Type in your domain name in the left box and then click “next” to see if it is available.
- If you already own a domain name and want to use it for your blog, type your existing domain in the right box and then click “next”. Only use the right box if you have previously paid to register a domain!
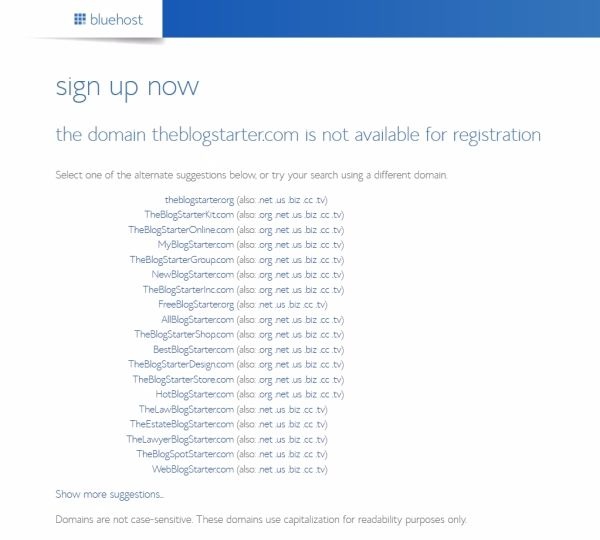
4. If the domain is unavailable you will be given a list of similar domain names that are available. You can choose one of the suggested domains or type in another name to try.
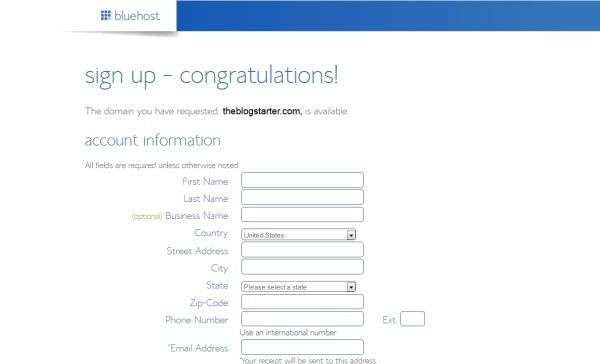
Once you have found an available domain name you will be taken to the registration page where you will put in all your billing details
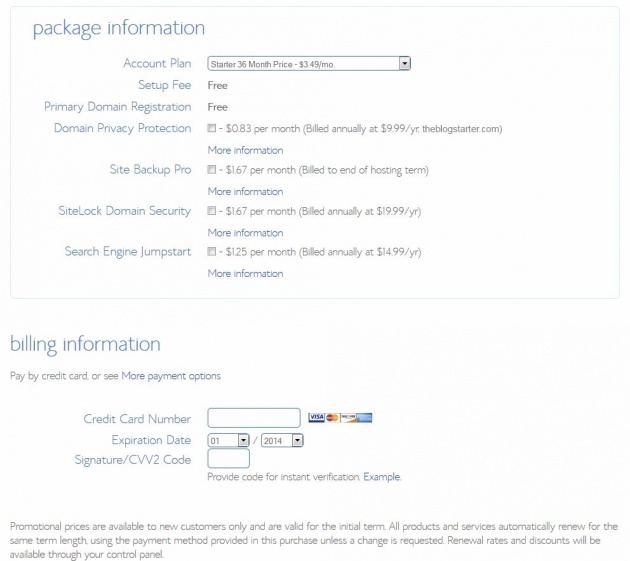
6. You will also need to choose your hosting package and options. I usually get the 36 month package, but a 12 month or 24 month package is also a great choice. I uncheck the boxes next to the other products when I sign-up. You can always add these at a later time if you need them
7. Once your account is setup (usually just a few minutes), you can login to your account by going to the BlueHost homepage and clicking the login tab at the top. Enter in your domain name and the password you chose when registering.

8. Now that you have logged-in to your account control panel, we can install WordPress, which is the software you will use for your blog. First, close any pop-up windows. Then look under the “Website” heading and click the “Install WordPress” link.
Too complicated? I will install your blog for you for free.

You will now be automatically logged-in to Mojo Marketplace and taken to the WordPress install page. Click on the “Install” button to get started.
Select your domain and click “Check Domain”.
Check the “Show advanced options” box. Now you can enter in your site title, username, and password. These can be anything you want, and all of them except the username can be changed later. Make sure to write down your username and password so that you don’t forget them! When you are done, check the box to agree to the terms and then click “Install Now”
WordPress is now installing! This should just take a few minutes.
9. Once the installation has completed you can click “View Credentials” at the top of the page to see your login information. This info is only available for 12 hours, so make sure to write it down in a safe place!

You will also receive an email with your login information as soon as the installation finishes.
Having trouble installing your blog?