'Stryrofoam and plastic milk jugs are biodegrable! Do you know what isn't biodegrable? Paper!-Rush Limbaugh-
Paper has invented in the East some 2,000 years ago. The ancient Greeks, Romans, and Egyptians all had a material like paper which was made from reeds. But paper as we know it was invented in China during the 1st century A.D. So it is not surprising that the art of paper folding should also have begun in the East. Paper has always played an importance part in the lives of Eastern people.
'Origami made to assumes concrete shapes of, for example, a crane or boat, ir regarded as origami a complete joy. However, I feel that these were probably once made for the purpose of bearing the illnesses and misfortunes that befell a person. They began to be made sometimes around the beginning of the Edo period (1600-1868) which coincided with an age in which mass-produced, low-priced paper came to be widely used among the people.'
-origami.gr.pj (visit this source)
ANCIENT PAPERS ART
At the Chinese wedding, red envelopes holding imitation money are burned to bring good luck to the newly married couple. And when someone dies, houses, servants, and furniture all made of paper are burned at the funeral. Many ancient peoples buried a dead person's possessions with him, together with other things he might need, so that he would not be short of anything in the next world. But in China, they bury the paper symbols of wealth and comfort.
'In 1948, Maying Soong (visit here) published the Art of Chinese Paper Folding. This book was important because it helped popularized paper folding in the 20th century while distinguishing Chinese paper folders from their Japanese countrypart.'
-thespruce.com
In one festival, the Japanese carry huge fish-shaped lanterns made of paper through the streets on poles after dark. The Japanese also make little paper ornaments called noshi, which are tied to gifts. These often take the form of the animals that are symbols of good luck.
In China and japan, magicians have for centuries hidden folded paper shapes under their robes. With a flick of the wrist, they produce as if by magic-brightly colored paper animals.
SECRETS OF ORIGAMI
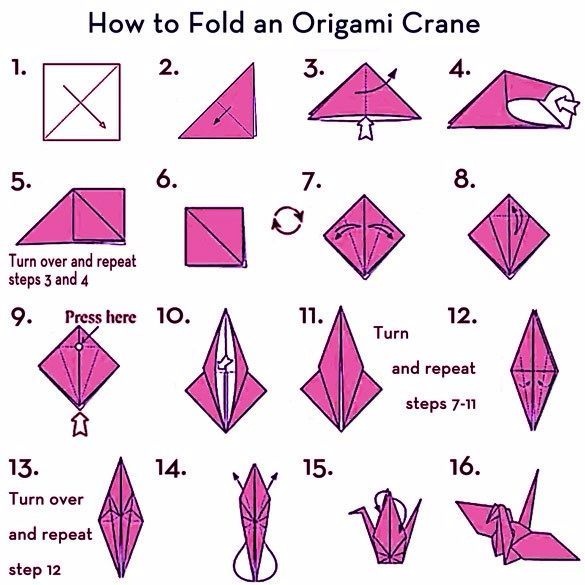
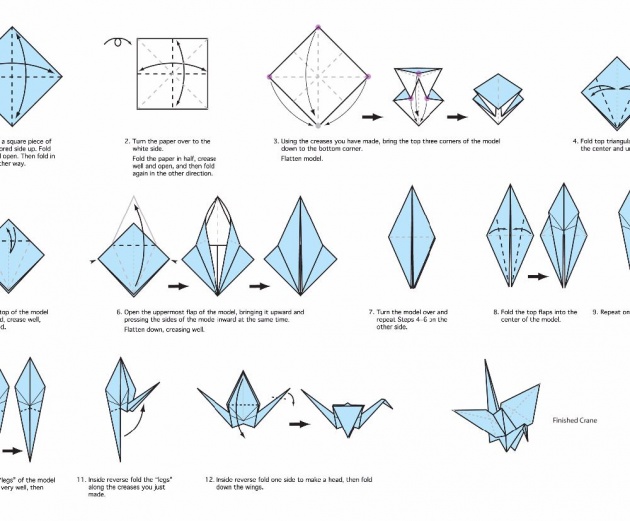
The art of paper folding is called origami. The name comes from the two Japanese words, ori, 'to fold, and kami, 'paper'. Many of the greatest paper folders have come from Japan, where the secrets of different models are passed on from father to son. The best known of the Japanese masters is Akira Yoshizawa. Many of the models in books on origami were invented by him.
Origami goes West
Visitors to and fro from Japan carried origami to the West. In England, the expert Lewis Caroll, author of Alice in the Wonderland, used paper figures as well as stories to entertain children. The Great Houdini, a stage magician, and famous escaper, also used origami in some of his acts. He even wrote a book about it.
In Spain, the author and thinker Miguel de Unamuno could work marvels with paper; he delighted children with his paper magical creatures. South America has a world famous lady paper folder- Ligia Montoya of Argentina. Italy's Guiseppe Baggi was already a master of the art while still a boy. The teacher used to send him out of the classroom because the other children were more interested in Baggi's skillful fingers than in the blackboard. Today, Baggi travels around the world, creating his magic for audiences everywhere.
HOW TO MAKE A WHALE
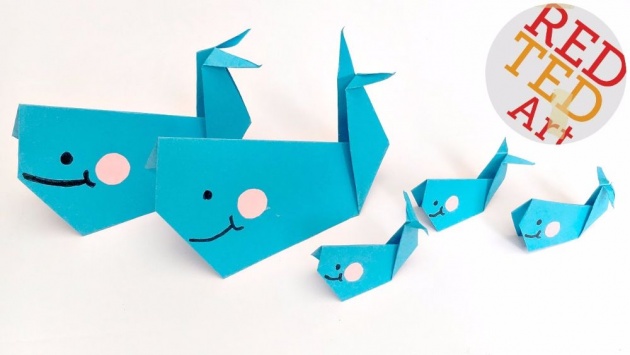
- STEP 1. Fold and crease along dotted line so point C rests on point D. Unfold.
- STEP 2. Fold and crease along dotted lines so points C and D meet in the center.
- STEP 3. Fold and crease along dotted lines so points E and F meet in the center.
- STEP 4. Turn form so point A is to the left and point B is to the right. Cut along the dotted line to make the flukes or separate parts of the tail. Fold form in half, as in step 5.
- STEP 5. Fold the two parts of tail up on either side of the body. Make sharp creases.
- STEP 6. Make the eyes, and draw a line for the mouth of the smiling whale.
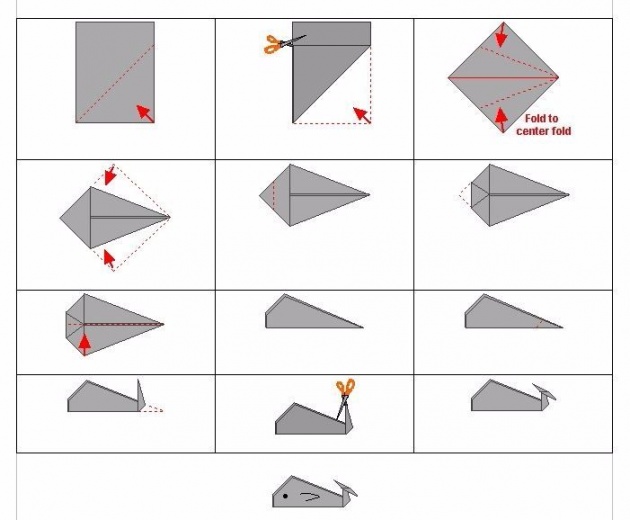
HOW TO MAKE A PENGUIN
- STEP 1. Fold and crease along dotted line so point C rests on point D. Unfold.
- STEP 2. Fold and crease along dotted lines so points C and D meet in the center.
- STEP 3. Fold point B up along the dotted line. Make sharp crease.
- STEP 4. Fold point D down along the dotted line. Make sharp crease.
- STEP 5. Fold and crease along dotted line so point F rests on point E.
- STEP 6. Fold point F over along the dotted line to make the penguin's foot. Make sharp crease.
- STEP 7. Turn form over. Fold point E to match other foot of penguin. Make sharp crease.
- STEP 8. Fold point A down along dotted line to make the penguin's head. Fold toward front slant line and then toward the back. Make sharp creases on both sides.
- STEP 9. Unfold so points up again. Separate folds of the head, and push head gently between the crease marks. You have now made a reverse fold. Press the folds to make the creases sharp, so the head will stay in place. Cut along the dotted line to separate penguin's tail. Fold flaps back and crease so penguin will stand.
- STEP 10. Make the eyes to complete penguin.
HOW TO MAKE A HELMET
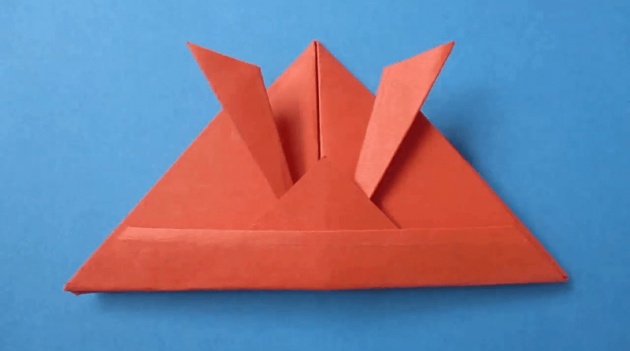
- STEP 1. Fold down and crease along dotted line so point A rests on points B.
- STEP 2. Fold down and crease along dotted lines so point C and D meet at point A.
- STEP 3. Fold up and crease along dotted line so point C and D meet at point E.
- STEP 4. Bring points C and D over on either side of dotted lines. Fold and crease points so that C and D are flared out, as in step 5.
- STEP 5. Fold point A up along the dotted line. Make sharp creases.
- STEP 6. Fold points F and G up along the dotted line to make the border of the helmet.
- STEP 7. Fold point B up inside the hat along the dotted line.
- STEP 8. Here is your helmet. Make a large one to wear and write your name on it.
DO'S AND DONT'S
Origami experts follow certain unwritten rules. For instance, you are allowed only to fold the paper-you must not glue it or cut it. And people should be able to tell what your model is without your having to draw on the paper. But like all good rules, these are made to be broken sometimes. A little cutting, or a few marks and a dash of paint, may turn a good model into a superb one.
By choosing the right colored and patterned papers, you give your models much of their life and character. Many papers are suitable for origami. The best are crisp papers that crease sharply when folded. These includes tissue paper, gift wrapping paper, and writing a paper. Brown wrapping paper is good for bigger models. The paper you start should be square. An eight-inch square is a good general size. Small, straight-edged scissors are best for cutting.
'Origami ethics are designed/realisation standards whithin which individual paperfolding designers are craft paperfolders may (or may not) choose to work and ideals to which they may (or may not) aspire.
The points of origami ethics is to preserve the degree of challenge that origami design and realisation offer, just as, for instance, the point of rock-climbing ethics is to preserve the degree of challenge that climbinig a rock-face offers.'
-paperandmore.com (visit this source)-
FOLLOW THE ARROWS
When you come to read the instructions for folding you will see that the first diagram has arrows showing which way you should fold. The second diagram shows what the paper should look like after you have folded it, and gives arrows for the next fold. So, as you fold, look ahead to the next diagram.
HOW TO MAKE A GOLDFISH
Follow the same steps from 1 to 6 used in making the helmet.
- STEP 7. Fold point B up along line.
- STEP 8. Push right hand inside form at point X. This will bring point G straight down to rest on point F. Turn form to look like step 9. Make sharp creases along the edges A-B and A-X.
- STEP 9. Make a pleat along dotted lines at point A. Cut along dotted lines from G to B to make the tail.
- STEP 10. Make the eyes to complete the goldfish.
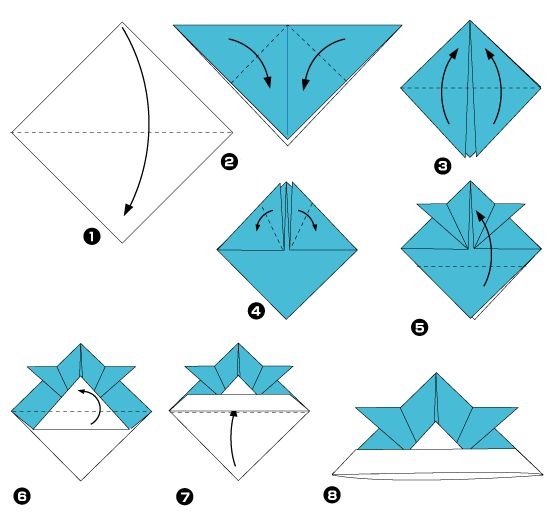
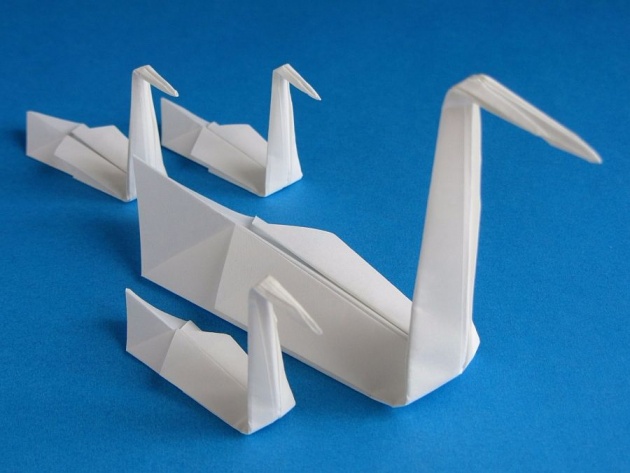
HOW TO MAKE A SWAN
- STEP 1. Fold and crease along dotted line so point C rests on point D. Unfold.
- STEP 2. Fold and crease along dotted lines so points C and D meet in the center.
- STEP 3. Turn form over. Fold points E and F back along dotted lines so they meet in the center. Turn form over. Point F is now on the left and point E is on the right, as in step 4.
- STEP 4.Fold point A down over dotted line to meet point B. Press fold.
- STEP 5. Turn form so points A and B are to the left. Fold point A over along dotted line to make the swan's head, as in step 6.
- STEP 7. Hold the swan's body with the left hand, and with right hand lift the neck away from the body, as in step 8. Make a sharp crease along the base neck. Hold the swan's neck with the left hand, and with right hand lift the head away from the neck. Make sharp creases to keep the head in place.
- STEP 8. Make the eyes to complete the swan.