Micro Controller Interfacing with 8*8 LED Matrix
8*8 LED Matrix:
Structure:
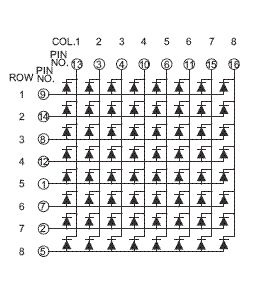
It consist of total 64 led which are connect in rows and columns. There are total 16 pins on two sides through which these 64 led are connected.Eight pins are connected in horizontally and other eight are connected in vertically.
What is mean of Horizontal and Vertical Connection?
Horizontal connection mean row wise led are connected. For example 1st row contain seven leds these all leds are are control by on only one pin,which is pin number one.Similarly Vertically mean column wise leds are connected through one pin. And there are also seven pins connected in column with only one pin..
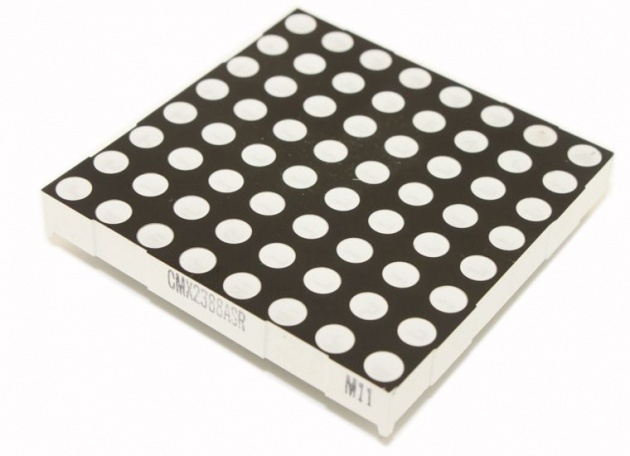
Following pictures shows the internal and external structure of LED Matrix.
Working of 8*8 LED Matrix:
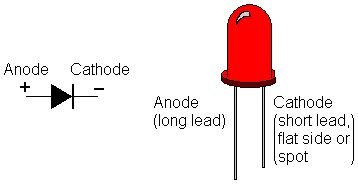
Its working is same as the working of a LED because it is the matrix of LEDs. When we apply the High voltage to Anode and Low voltage to the cathode Led will glow.
Following picture shows the terminal of LED.
This is the over view of 8*8 LED Matrix.
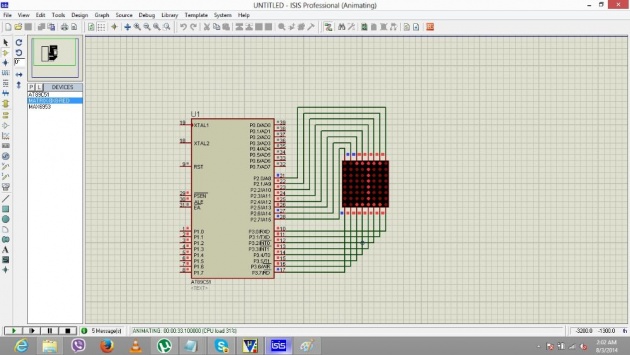
Now we have to control it through a micro controller. As we discussed its behave in above description so the similarly, we will control it through controller.One port is used for Anode of the Matrix and other port is used as the Cathode of the Matrix. When we send high voltage to pin 1 of matrix, its mean column one of leds which are connected with pin one are on high voltage. And when we send Low voltage through second port on the opposite terminal pin one which is basically pin nine then the 1st led will glow.
It is how we glow leds.
Lets we print letters Z A H I D on this matrix.Controlling code for matrix is written below. This code is write in Keil software.
Code:
#include<AT89x51.h>
void delay()
{
unsigned int y;
for(y=0;y<200;y++);
}
void display1()
{ int x;
for(x=0;x<100;x++)
{
P3=0x7E;
P2=0xFF;
delay();
P3=0xBF;
P2=0x82;
delay();
P3=0xFD;
P2=0x41;
delay();
P3=0xDF;
P2=0x04;
delay();
P3=0xEF;
P2=0x08;
delay();
P3=0xF7;
P2=0x10;
delay();
P3=0xFB;
P2=0x20;
delay();
}
}
void display2()
{int x;
for(x=0;x<100;++x)
{// for A;
P3=0x7F;
P2=0x3C;
delay();
P3=0x8F;
P2=0x42;
delay();
P3=0xF7;
P2=0x7E;
delay();
P3=0xF8;
P2=0x42;
delay();
}}
void display3()
{int x;
for(x=0;x<100;x++)
{// for H;
P3=0X18;
P2=0X42;
delay();
P3=0XE7;
P2=0X7E;
delay();
}
}
void display4()
{int x;
for(x=0;x<100;++x)
{// for I;
P3=0x7F;
P2=0x3E;
delay();
P3=0x81;
P2=0x08;
delay();
P3=0xFE;
P2=0x3E;
delay();
}
}
display5()
{ int x;
// for D
for(x=0;x<100;++x)
{
P3=0x7E;
P2=0x78;
delay();
P3=0xBD;
P2=0x44;
delay();
P2=0x44;
P3=0xC3;
delay();
}
}
void main()
{P2=0;
while(1)
{
display1();
display2();
display3();
display4();
display5();
}
}
Following picture shows the printed letter " I ".
Other pictures of printed letters on 8*8 led matrix are uploaded in Gallery. So visit Gallery to see the pictures of 8*8 Matrix.Related movie is uploaded in Filmannex Movie.In these movies we learn how to interface led matrix with controller and How we program the controller for Matrix. So for video visit to
http://www.filmannex.com/movie/88-red-led-matrix-interfacing-with-89c51-controller/52148
http://www.filmannex.com/movie/88-yellow-led-matrix-interfacing-with-89c51-controller/52147
Written By:
Ihtasham Zahid