I just received one of my online orders which is the eyelash perming kit. I got so excited to try it immediately. I bought the kit from an online store at a very cheap price. I've been going to the salon just to get my lashes permed and it cost me around P300 every 3 months. So I decided to look for it through online and now I am going to give my review and how I permed my lashes.
Here are the contents of the kit:
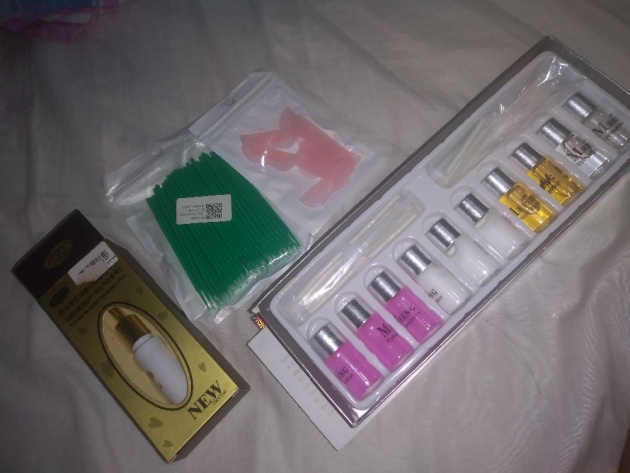
The brand is MEISHING. I bought it on shopee. It contains 3 perm agent which is the pink colored solution, 3 finalizing agents the white ones, 2 moisturizing agents which are the colored yellow and 2 cleaning solutions the clear ones. Also it has 10 sets of paper rolls and a paper for instructions.
Some other things I bought:
I noticed that the kit doesn't have any glue and that the paper rolls don't stick near the eyelids, so I had to buy again for some perming glue from another online shop. Then I also bought some cotton tip applicators as well as 5 pairs of different sizes silicon eyelash curling pads.
Total price for the items I bought: P487 plus shipping fee. So in total, I spent P560 for all the things that I need.
How to Perm Your Lashes?
So this is the step by step guide on what I did to curl my lashes.
1. Apply some thin layer of perming glue in eyelids then wait for it to dry a bit before putting the silicon pads so that it sticks in your lids (or use the paper rolls instead of the pads). However, I would suggest that you don't really have to buy the pads but instead use the paper rolls that are in the kit. Though my lashes did curl but because of the pads that I used, It all curled in upward direction and so it is not that pleasing to look at especially that my lashes are so long.
2.Apply again the perming glue on top of the pad.
3. Using a toothpick on in my case, the cotton tip applicators, carefully turn your lashes one by one on to the rolls. Make sure that your lashes sticks on the rolls or pads.
4. Apply or brush the pink solution known as the perming agent using a cotton tip applicator on top of your lashes densely. Wait for 10 minutes, if you have thick lashes, you can wait up till 15 minutes. Do not apply it longer than the allowable time or your lashes will be "cooked" or crooked.
5. Apply an ample amount of finalizing agent, the white colored solution on top of the lashes with the pink solution and wait for 3 minutes minimum or up to 5 minutes maximum time before apply the next one.
6. Apply the third solution which is thw moisturizing agent That is the clear yellow ones and brush it to your lashes for 5 - 10 minutes.
7. Lastly, take a sufficient amount of cleaning agent, the clear one, and one by one loosen your lashes from the curler pad or roll pad.
8. Take the silicon pad or paper rolls from your lids and clean your eyelids still using the cleaning agent.
Some tips to follow that I wish I had done from the beginning of trying the kit:
- Use a toothpick when turnings your lashes and sticking it to pads.
- Use the paper rolls instead of the silicon pads. It gives a better curl than the plastic ones.
-Use a water cellophane or clear cellophane and cover your lashes after every agent application. this is very useful especially because each agent can loosen your lashes from the pads. It helps in letting your lash stick on the pads.
-USE A TIMER! Do not go beyond the maximum allowable time for each agnt or you will really regret. Always put in mind that these agents are made of chemicals. It may sting or burn your skin or it can cook your lashes thus making it brittle.
-Be careful not to any perming or finalizing agents on to your skin. It might cause an allergic reaction.
My thoughts on the perming kit:
The total cost is really cheap compared to going at the salon every 3 months. The kit can perm a mimum of 5 sets of lashes up to 10sets. It is very easy to use and even first timers can follow their instructions easily. So this is a huge and great deal for me and i would really recommend it to anyone who wants to curl their lashes.